
Project Spotlight:
The Herzanek Epoxy Countertop

You’ve heard of epoxy river tabletops, but have you heard of epoxy river countertops? This was a first for us! The Herzaneks, in collaboration with Hammersmith Structures, came to us with an idea for an epoxy river countertop for their guesthouse kitchen. We thought to ourselves, “Sure, I don’t see why not.”
Here’s a behind-the-scenes look at how we did it.
Selecting the Slabs
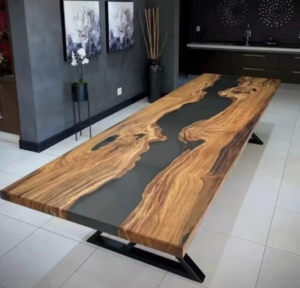
The Herzaneks worked with us to find the perfect pair of slabs. The goal was to create a statement piece that was going to stop people in their tracks, remain timeless, and play well with the green cabinetry in the kitchen. They sent over some inspiration photos of what they were after (pictured above). After a few months of searching through our extensive live edge slab inventory, they fell in love with a beautiful pair of Black Walnut slabs.
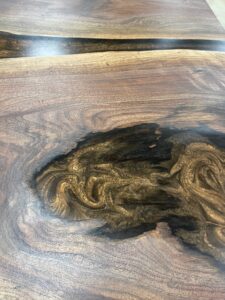
Black Walnut is definitely our most popular species – known for it’s stunning, dark color tone and durability, we knew that it would compliment the surrounding design and stand the test of time.
Laying it Out
One of the challenges in doing epoxy river projects is finding a layout that will work with the slabs and the proposed design. We placed the slabs on our shop floor to make sure the wood would cover the cabinets boxes, and that the epoxy would flow in a way that looked natural.
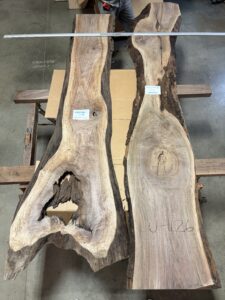
This was also tricky because instead of placing legs underneath, we had cabinet underneath, and had to make sure the countertop had an appropriate overhang from each side. If there was too much overhang, you wouldn’t be able to get into a top drawer as easily. If there was too little, the cabinet boxes below would be exposed.
Getting the Color Just Right
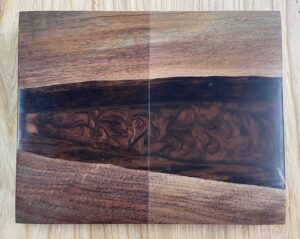
When designing and fabricating any epoxy river project, we take our time to ensure the color and finish are exactly what you’re looking for. With this project, we went through a couple iterations of color mixtures, and landed on a beautiful mix of Espresso and Black. In our sample, we wanted to make sure we got as much clarity as possible, so the General Finishes Clear Hard Wax Oil was the obvious winner.
Mocking it Up
After the epoxy color, finish, and initial layout had been finalized, we moved onto putting together a model.
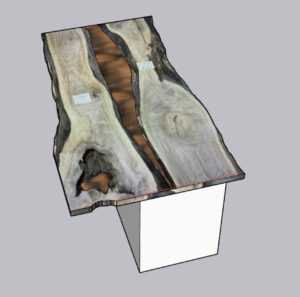
Shop drawings, mockups, and models are typically provided to you, the client, to give you a good idea of what the finished product will look like. This also helps our shop to have an example to build off of.
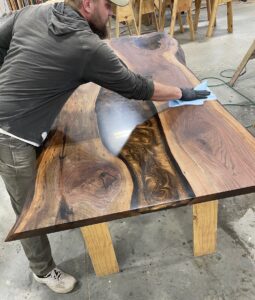
Fabricating the Countertop
Once everything is signed off on, we are cleared for takeoff! For large epoxy pours like this one, it typically takes 8-10 weeks from start to finish. There is a lot of pouring epoxy, popping bubbles, waiting, and repeating.
After everything is cured, we sand to a 220 grit on the wood (so that the finish is still able to soak in), and then buff the epoxy to give it that extra bit of clarity that will really make it pop.
We then can apply the General Finishes Clear Hard Wax Oil by hand, and buff it into both the wood and epoxy.
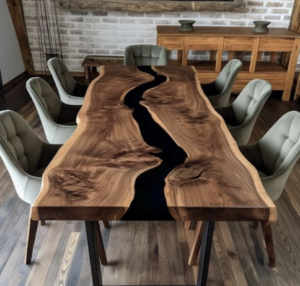
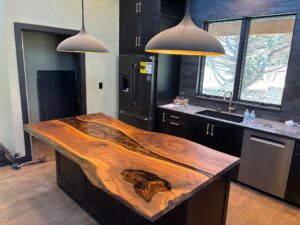
The Finished Product
The finished piece takes center stage in this guesthouse kitchen. The Black Walnut pops, but doesn’t compete with the surrounding fixtures, and the epoxy color compliments the warmth of the wood perfectly. The protective topcoat remains matte and won’t reflect the sunlight from the windows, and, they can touch it up as needed over the years to come.
Got a remodel or a new build in the future? We’d love to chat about how we can help and make your dreams a reality. Or, if you’re a fellow woodworker looking to try out epoxy, stop by our showroom. We carry West System and SuperClear products and will order them in just for you.